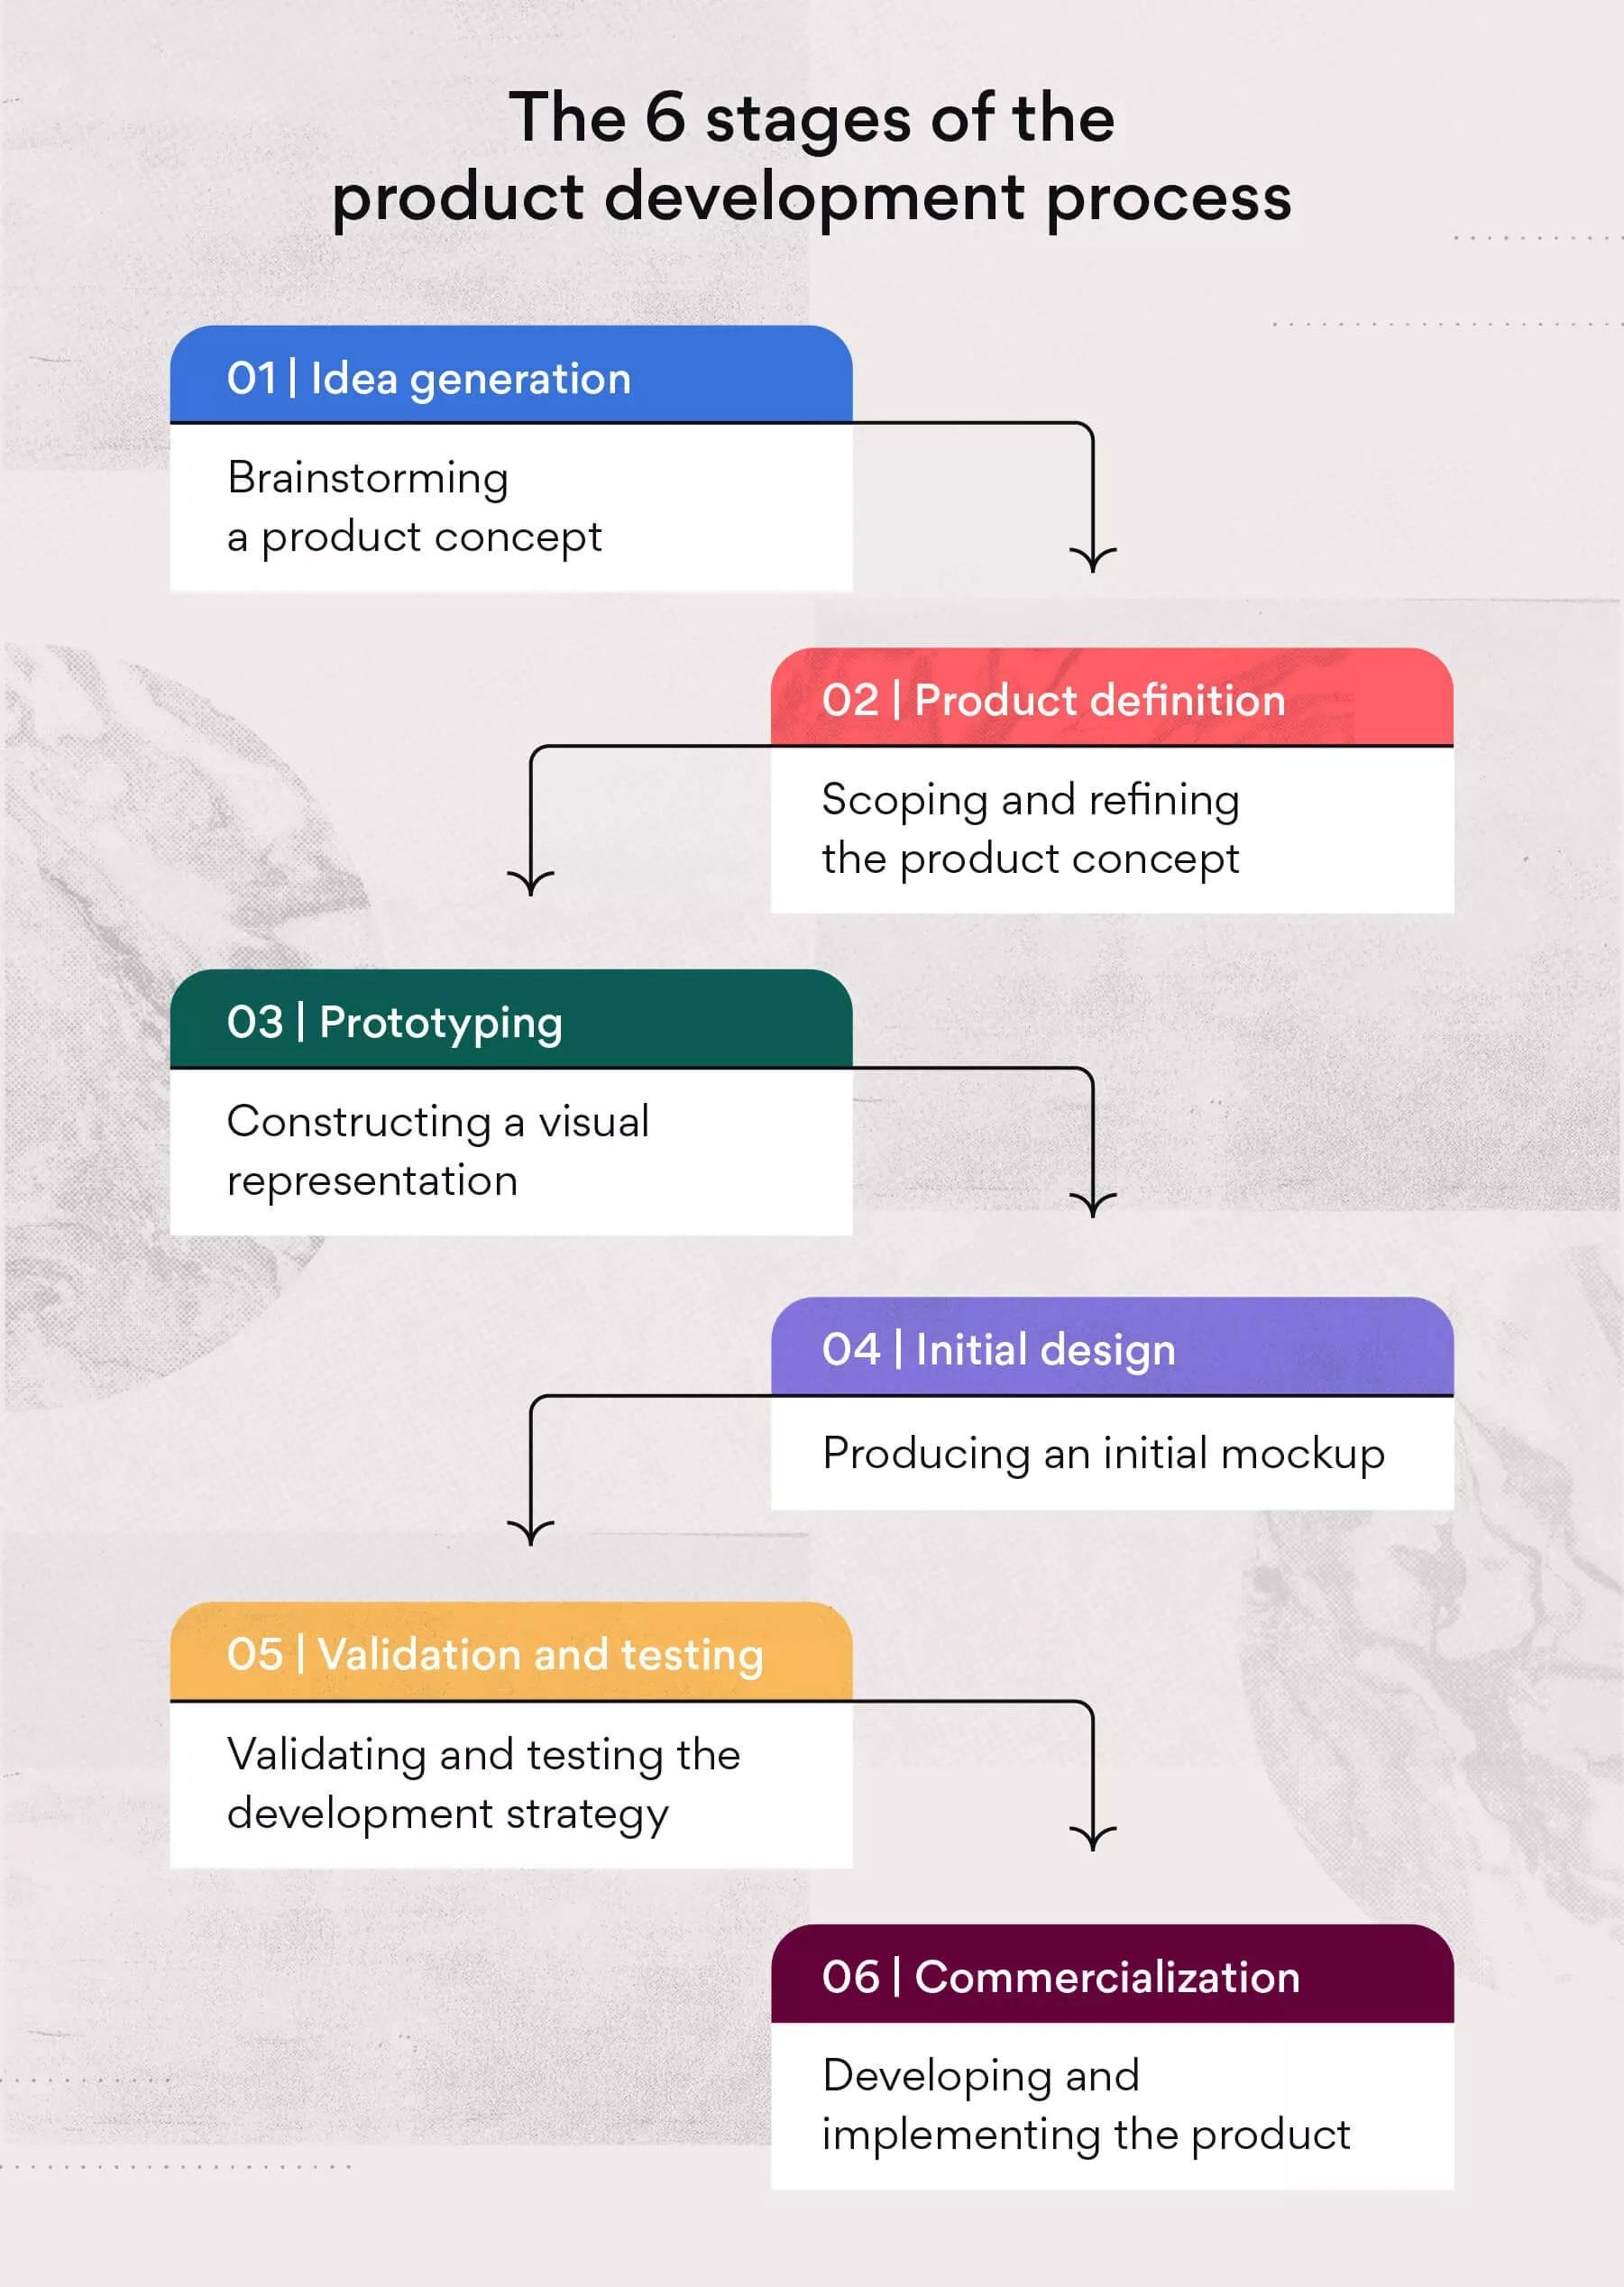
The product development process involves these six stages: ideation, research, planning, prototyping, testing, and launch.
Have you ever wondered how amazing products come to life? The journey isn’t magic; it follows a structured path. Understanding the product development process: The 6 stages is key for anyone involved in creating something new.
These stages, from initial idea to final launch, guide teams. Each step plays a vital role, ensuring a successful product. Knowing this process helps you avoid common mistakes.

Product development process: The 6 stages
Creating something new, whether it’s a cool gadget, a helpful app, or even a tasty snack, is a big adventure! It’s not just about having a great idea; it’s also about how you bring that idea to life. That’s where the product development process comes in. Think of it as a roadmap, guiding you through the steps needed to turn your brilliant thought into something real and useful. This process usually has six main stages, which we’ll explore in detail. Understanding these stages is super important for anyone who wants to make something amazing, from big companies to students with a creative project.
Stage 1: Ideation – Where Ideas Spark
Imagine a brainstorming session with lots of colorful sticky notes and excited voices – that’s kind of what ideation is all about! It’s the very first step in the product development journey. The goal here is to generate as many ideas as possible, without worrying too much about whether they are perfect or doable yet. It’s about quantity over quality at this point. Let’s dive deep into what happens during this initial stage.
Brainstorming Techniques
Brainstorming is a popular technique used during ideation. It’s like a party for ideas! Here are a few ways to brainstorm effectively:
- Classic Brainstorming: Everyone throws out ideas, no matter how silly they sound. We write them all down.
- Reverse Brainstorming: Instead of thinking of solutions, we think about what could go wrong with existing products. This can spark new ideas for improvements.
- Mind Mapping: We start with a central idea and branch out with related concepts, creating a visual map of thoughts.
- SCAMPER: This is an acronym that helps us think about new ideas: Substitute, Combine, Adapt, Modify, Put to other uses, Eliminate, Reverse.
The important thing is to create a comfortable environment where everyone feels free to share, because the most unexpected thought could be the gem you were seeking. Think of it as planting lots of seeds, knowing that some will grow into something incredible.
Identifying Problems
Often, great ideas come from recognizing a problem that needs solving. So, before we brainstorm, we should ask ourselves:
- What are the everyday challenges that people face?
- What could make things easier or better?
- Are there any gaps in the market that we can fill?
By focusing on real problems, we make sure our product has a purpose and solves a need. This is key to its potential success.
Analyzing the Market
Even in the early stage of ideation, you should begin thinking about the market. Who are the people that might want your product? What are their needs? By analyzing the target market, we can make sure that we are designing something they would actually use. If we see that a similar product already exists, we can think about how to make ours different or better. This helps prevent wasting time on ideas that won’t work in real world situations.
Documenting Ideas
As ideas begin to flow, it’s vital to document them carefully. This means writing everything down, sketching out concepts, or even making basic prototypes with materials you have available at home. This early documentation becomes very valuable as we move to the next phase of product development. The documentation helps us remember all the ideas and can be reviewed and modified as we develop further.
Stage 2: Definition – Refining the Idea
Okay, so you have a bunch of ideas. Now it’s time to get serious! The second stage of the product development process is all about definition. This means taking all of those exciting ideas from Stage 1 and choosing which one you want to focus on. This involves defining in detail what the product will actually be and who it’s for. It’s like choosing the best seed from the bunch and deciding how to nurture it.
Feasibility Analysis
Before we get too attached to an idea, we must analyze if it’s actually possible to bring it to life. We have to consider several factors:
- Technical Feasibility: Do we have the necessary technology or know-how to build this product?
- Financial Feasibility: Can we afford to develop the product, and will we be able to sell it at a price that’s both competitive and profitable?
- Market Feasibility: Is there a demand for this product? Will people actually buy it?
This step helps us avoid wasting resources on ideas that aren’t realistic. We need to understand the real world limitations and how we are going to meet them. It’s important to be honest with ourselves.
Defining the Target Audience
Knowing who your product is for is very important. This is called defining the target audience. We don’t want to make something that nobody needs or wants. This involves figuring out:
- Demographics: Who are our customers by age, location, gender, income, etc.?
- Needs and Pain Points: What problems are they trying to solve?
- Psychographics: What are their interests, values, and lifestyle choices?
The more we know about our audience, the better we can tailor our product to meet their specific requirements. By understanding the target market we can also see if our product is addressing a need.
Creating a Product Requirements Document
A Product Requirements Document (PRD) is like the blueprint for the product. It’s a written document that explains everything about the product. It includes a detailed description of its features, functionalities, and performance expectations. Here are a few things it usually includes:
- Product Description: What the product is and what it does
- Features and Functionality: What are the key things it can do?
- User Stories: How real people will use it (e.g., “As a user, I want to be able to quickly find information”)
- Performance requirements: How fast, reliable, and scalable the product has to be
- Design specifications: How it should look and feel
Having a well-written PRD is essential because it ensures everyone on the development team is on the same page and understands what we are trying to achieve. It’s a common point of reference for the design, development, and testing phases. It’s a guide to make sure everyone is working toward the same goal.
Stage 3: Design – Creating the Blueprint
Now that we’ve defined our product, it’s time to give it some shape. This is the design phase. It’s where we take the idea and turn it into something that’s easy to use, attractive, and functional. This step requires careful planning and creativity. The design phase can be further broken into two sub-phases: Conceptual design and detailed design
Conceptual Design
Conceptual design is the broad strokes. It’s where we figure out the overall look and feel of the product. This involves:
- User Experience (UX) Design: How the user interacts with the product. We focus on how easy and enjoyable it is to use. We create wireframes, which are simple sketches that show the layout of the product, such as where buttons and menus should go.
- User Interface (UI) Design: How the product looks visually. We select colors, fonts, and images that make the product appealing and easy to understand. We also create mockups to show exactly how the product will appear on different devices.
During this phase, we make sure the design is user-friendly, focusing on simplicity and clarity. We create a design that the users will actually want to interact with. A good design makes it easy for them to accomplish the task that the product was made for.
Detailed Design
With conceptual design complete, it’s time to move into the nitty-gritty. The detailed design phase is about finalizing all the design elements and specifying exact dimensions and materials:
- Creating Prototypes: We make working models or demos of our product to test its functionality and design. These prototypes can range from simple paper models to more complex digital versions. This gives us an idea of how the design will work in real life, and also allow for feedback from potential users.
- Technical Drawings and Specifications: We prepare detailed engineering drawings that guide the manufacturing process. It covers aspects like the dimensions, materials, and tolerances of the product. This guarantees that each part is precisely as planned.
- Design Reviews: We go over our designs with a team of experts and stakeholders to get their opinions. This is important because it helps us spot any possible issues or points for improvement before we start building the actual product.
The outcome of the detailed design phase should be a complete and precise plan, ready for implementation. It’s the basis upon which the product is developed.
Stage 4: Development – Bringing the Design to Life
Now that the design is set, the real fun begins – it’s time to build the actual product! This is the development phase, where the plan in the previous stage is turned into reality. It’s a complex process that requires coordination and collaboration.
Software Development
If your product is an app, website, or other piece of software, this stage involves writing code and building the features that were described in the PRD. Here are some typical activities:
- Coding: Software engineers write the instructions (code) that make the program work. They often use different programming languages and frameworks depending on the project requirements.
- Database Development: If the product needs to store or retrieve data, we build and set up databases that will handle this data securely. This involves designing the structure of the database and implementing security measures.
- API Development: We create application programming interfaces (APIs) so that different parts of the software or different systems can talk to each other. APIs are like bridges connecting different digital systems.
This is a crucial stage, as it sets the foundation for the quality and functionality of the product.
Hardware Development
If your product is a physical item, this stage involves building and assembling the parts and components according to the specifications. Some key steps include:
- Sourcing Materials: We get the correct raw materials and components required for manufacturing the product. This might involve dealing with various suppliers and ensuring high quality and value.
- Manufacturing and Assembly: This is where the physical product is actually built. It might include techniques like molding, machining, or electronics assembly, depending on the design.
- Quality Control: During manufacturing, we check the products at various stages to make sure they meet quality standards and specifications. This prevents defects in the final product.
This phase needs precision and good resource management to keep the product on schedule. It also needs to ensure all the components come together seamlessly.
Project Management
Developing any product, whether software or hardware, involves careful project management. This includes:
- Setting Timelines: We establish clear timelines and milestones for each stage of development. This helps us keep the process moving along and ensure that the product will launch on time.
- Managing Resources: We monitor and allocate the resources, such as people, budget, and equipment, needed to create the product. This helps avoid wasting resources and make sure everything flows smoothly.
- Communication and Collaboration: We make sure that everyone on the team is well-informed about project progress, potential problems, or changes. Clear and open communication is a key for efficient collaboration and helps ensure everyone is working together to reach the goals.
Careful planning and communication are necessary to keep a development project on track. This helps to reduce risks and keep the project within the budget.
Stage 5: Testing – Ensuring Quality and Functionality
Before the product is released, it needs thorough testing. This is Stage 5 of the product development process. It’s all about finding any problems, making sure everything works well, and that the product is good to go for the end users. It’s like giving the product a check-up before a big race.
Types of Testing
Testing can be done in many different ways, and it’s important to test everything as carefully as possible. Here are some common types of testing:
- Functional Testing: Checks if the product does what it is supposed to. Each function, or feature, is tested to make sure it works correctly.
- Usability Testing: Looks at how easy the product is for people to use. This usually involves real users trying out the product and giving feedback on their experiences.
- Performance Testing: Checks if the product is fast and efficient, even with many users or lots of data. It also tests the response time and stability of the product.
- Security Testing: Makes sure the product is safe and can protect people’s data. This step includes looking for possible weaknesses that might cause security problems.
- Compatibility Testing: Verifies that the product works well on different devices, operating systems, and browsers. This makes sure that the product has no problems on a variety of devices.
These tests make sure that the product is high quality, functional and reliable. By using many different types of testing we can be sure that the product is ready to be released.
Bug Reporting and Fixing
During testing, it’s natural to find bugs (which are simply mistakes in the product). Bug reporting is important to document every issue, along with information about how to fix it. This process involves:
- Logging Bugs: Documenting each bug with its nature, how it happens, and its impact.
- Prioritizing Bugs: Deciding which bugs to fix first depending on their seriousness. Critical bugs that stop the product working are usually fixed first.
- Fixing Bugs: Developing and testing fixes for all the reported issues.
- Re-Testing: Re-testing the fixes to make sure the problems have actually been solved and that no new issues have been created.
This repeated process of testing, fixing, and re-testing is important for improving the quality of the product. By addressing each problem as it is discovered we can be sure the final product is as close to perfect as possible.
User Acceptance Testing (UAT)
Before going to market, it’s important to get feedback from real people who will actually use the product. User Acceptance Testing (UAT) involves:
- Recruiting Real Users: Getting people from the target market to try out the product.
- Gathering Feedback: Watching how users use the product and gathering their thoughts and suggestions.
- Making Final Adjustments: Making necessary changes based on the feedback received from the users.
This is an essential step for ensuring that the product meets the users’ expectations. It helps ensure that the product is a real-world success and ready for the market. It’s the last chance to make sure that the product works well for those who will use it regularly.
Stage 6: Launch – Bringing the Product to Market
After all the hard work, it’s time for the final step: launching the product. This is where your creation finally reaches the hands of the people who will use it. The launch phase involves a lot of careful planning and execution to make sure everything goes as smoothly as possible.
Marketing Strategy
To get the word out about our product, we need a well planned marketing strategy. This might include:
- Branding: Creating a memorable name, logo, and brand story that will appeal to our audience. It’s about what the customer thinks about when they think of your product.
- Promotion: Advertising the product through various channels, like social media, online ads, email marketing, and more.
- Public Relations: Getting media outlets to write or talk about our product, building awareness and credibility.
A good marketing strategy makes sure our product gets noticed by the people that are most likely to buy it. This is a crucial aspect of any product launch.
Sales and Distribution
After we get people’s attention, we also need to figure out how to get our product into their hands. Here are some strategies:
- Online Sales: Setting up an e-commerce website or selling through platforms like Amazon, etc.
- Retail Sales: Selling the product in physical stores.
- Partnerships: Working with other companies to sell or promote the product.
The sales and distribution strategy will depend on our product, our target market, and our resources. By strategically selecting different channels, you are sure to reach the target audience.
Post-Launch Monitoring and Support
A product launch isn’t the end of the story. It is vital to watch how the product is performing and help users. This includes:
- Collecting User Feedback: Asking users for their opinions on the product through surveys, reviews, and social media.
- Tracking Product Performance: Monitoring sales, website traffic, and user engagement to know how well the product is doing.
- Providing Customer Support: Responding to user inquiries, resolving issues, and offering help when needed.
This post-launch support is vital for long-term success. By listening to the users and monitoring the product’s performance, it can improve, fix any problems, and keep users happy. It’s an ongoing effort to make sure the product performs well.
The product development process is a journey, not just a destination. It involves careful planning, creativity, and collaboration through all the steps. Each stage is equally important to make the product a success. By following these six stages, anyone can take their great idea from the drawing board to reality and see it shine in the real world.
New Product Development Process – 6 Stages
Final Thoughts
The six stages of the product development process guide ideas from conception to launch. These include ideation, research, planning, prototyping, testing, and analysis. Each stage is essential for a successful product.
A well-defined process ensures your product meets user needs. Following each step minimizes risk and maximizes value. The product development process: The 6 stages offers a systematic approach.
Using the framework effectively is a must for developers. Doing so will enhance your chances of a positive outcome.